CS2 Trade Up Float: The Formula, a Worked Example, and Why Your Output Was Field-Tested

Sukie · Founder & Market Tracker
Sukie has tracked the Counter-Strike skin economy since 2023, maintaining a price-history spreadsheet that covers 400+ skins and testing every major marketplace with her own inventory. She writes and updates every guide on CS2 Skin Prices herself.
Last updated: 2026-09-16
The CS2 trade up float question arrives in the same form every time: I put in ten Factory New skins and got a Field-Tested one back, is this a bug? It is not a bug, and once you have seen the formula you will never be surprised by a trade-up output again. The contract does not copy your input float. It takes the average of your ten inputs, treats that average as a position between 0 and 1, and then maps that position onto the output skin's own float range — which is frequently nothing like 0 to 1.
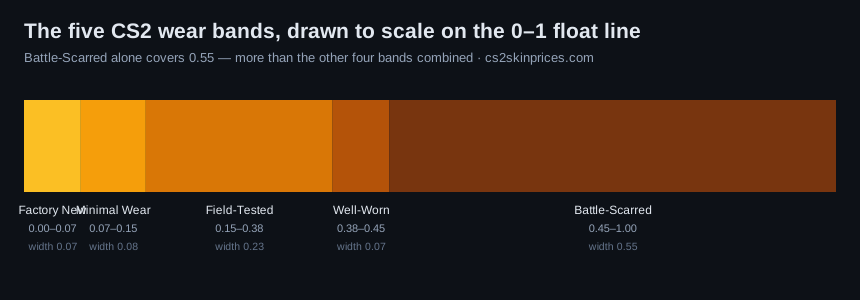
That last step is where everyone gets caught. If the skin you are rolling for has a minimum float of 0.10, then no combination of inputs on earth produces a Factory New result, because the game will not generate a float below 0.10 for that item under any circumstances. Below is the arithmetic, a fully worked example with real numbers, and the four practical rules that follow from it.
The formula
Trade-up output float is calculated as:
output_float = (avg_input_float × (output_max − output_min)) + output_min
Where avg_input_float is the plain arithmetic mean of your ten input floats, and output_min / output_max are the float cap of the specific skin you receive — not of the collection, and not of the wear tier.
Three things follow immediately, and each one contradicts a common belief.
Your input wear tiers are irrelevant. Only the numeric floats matter. Ten Field-Tested skins averaging 0.16 will outperform ten Minimal Wear skins averaging 0.14 by exactly the amount that difference implies — the labels do nothing.
The output skin's cap decides the ceiling before you begin. If output_min is 0.10, then even a perfect 0.00 average returns exactly 0.10.
A narrow output range compresses everything. If a skin runs 0.10–0.25, your entire input effort moves the result across a 0.15 window. If it runs 0.00–1.00, the same effort moves it across the full scale.
A worked example, start to finish
Say you assemble ten Mil-Spec inputs with these floats: 0.021, 0.034, 0.018, 0.045, 0.029, 0.038, 0.012, 0.027, 0.041, 0.035.
Step 1 — average them. The sum is 0.300, so the average input float is 0.030. Every input is comfortably Factory New.
Step 2 — identify the output skin's float cap. Suppose the contract returns a skin whose range is 0.10 to 0.60.
Step 3 — apply the formula. (0.030 × (0.60 − 0.10)) + 0.10 = (0.030 × 0.50) + 0.10 = 0.015 + 0.10 = 0.115
Result: 0.115 — Minimal Wear. Ten Factory New inputs, an average float of 0.030, and the output cannot be Factory New because the skin's floor is 0.10. You got the best possible result for that skin and it still was not FN.
Now run the same inputs against a skin with a 0.00–0.80 range: (0.030 × 0.80) + 0.00 = 0.024 — a Factory New output, and a very low-float one. Identical inputs, completely different outcome, decided entirely by the output skin.
Why you cannot know which skin you will get
A trade-up contract returns one skin from the pool of possible outputs, which is determined by the collections your inputs came from. If your ten inputs are all from one collection, the output pool is that collection's next rarity tier. If you mix collections, the pool spans all of them, weighted by how many inputs came from each.
This means the float cap you should plan against is not a single number but a distribution. Before running any contract, list every possible output skin and check the float range of each. If some of them have a floor above 0.07 and some do not, your outcome is partly a lottery on which skin you get, independently of your float work.
The practical consequence: single-collection contracts are far easier to reason about than mixed ones, because the output pool is smaller and you can check every member of it. Our CS2 knife trade-up page covers the related question people ask most — and the disappointing answer, which is that knives are not a trade-up output tier at all.
A second worked example: when mixing collections goes wrong
The first example assumed you knew which skin you would receive. In practice most people run mixed contracts without checking, so here is what that looks like with numbers.
Say you put in seven inputs from Collection A and three from Collection B, with an average float of 0.09 across all ten. The output pool is now every next-tier skin from both collections, weighted 7:3 in favour of A. Suppose Collection A's next tier holds two skins with ranges 0.00–0.50 and 0.00–0.70, and Collection B's holds one skin with a range 0.14–0.65.
| Possible output | Range | Your float | Wear |
|---|---|---|---|
| A-1 | 0.00–0.50 | 0.045 | Factory New |
| A-2 | 0.00–0.70 | 0.063 | Factory New |
| B-1 | 0.14–0.65 | 0.186 | Field-Tested |
Same inputs, same average float of 0.09, three possible results spanning two wear tiers. Roughly a 30% chance you land on B-1 and receive a Field-Tested skin no matter how clean your inputs were. Nothing went wrong — you simply ran a contract whose output pool contained a skin you had not checked.
This is why I check every member of the output pool before buying a single input, and why I avoid mixed contracts unless I have a specific reason. The five minutes of checking is the cheapest part of the whole exercise.
The four rules that actually matter
1. Check output float caps before buying inputs. This is the whole game. Spending three days sniping 0.001-float inputs for a contract whose outputs all floor at 0.14 is wasted effort — and it is the most common way people burn money on trade-ups.
2. Optimise the average, not the individual floats. One 0.001 input among nine 0.06 inputs moves the average by about 0.006. Ten evenly low inputs beat one trophy input and nine ordinary ones, every time.
3. Prefer wide output ranges when hunting low floats. A 0.00–1.00 output skin rewards low-float inputs proportionally; a 0.10–0.25 skin barely responds at all.
4. Price the inputs against the realistic output, not the best output. If the output pool has five members and only one is valuable, your expected value is weighted across all five. Assuming you will get the good one is how trade-ups become a slow way to lose money.
Reading the float on your inputs
You cannot optimise what you cannot see. Steam Community Market does not display float on listings, so you need the inspect link and a float-reading tool; CSFloat and Skinport display exact floats directly on the listing, which makes them substantially better venues for sourcing trade-up inputs.
The full method, including the free tools and how to read an inspect link, is on our how to check CS2 float guide, with the tool comparison on CS2 float checker. If you are not yet clear on what the underlying number means, start with the CS2 float chart.
Common misconceptions, corrected
"Ten Factory New inputs guarantee a Factory New output." No — see the worked example. The output skin's minimum float overrides everything.
"StatTrak inputs give a StatTrak output." True, but they must all be StatTrak; contracts cannot mix StatTrak and non-StatTrak inputs.
"Using a skin lowers its float, so I should trade up with fresh ones." Float never changes after creation. Playing with a skin does nothing to it.
"The wear label of my inputs is what gets averaged." Only the numeric float is used. Two Field-Tested skins at 0.16 and 0.37 contribute very differently.
"Trade-ups are a reliable way to profit." They are a probability exercise with a house edge on most collections. They can be positive expected value in specific, researched cases, and they are negative in the overwhelming majority of casual ones.
What the contract does not do
Three mechanics people expect and that do not exist, worth stating plainly because each one has cost somebody money.
There is no float floor protection. The contract will happily hand you the worst possible output skin at the float your inputs earned. There is no re-roll, no minimum quality guarantee, and no way to reverse a completed contract.
Stickers, name tags and StatTrak counters on inputs are destroyed. Anything applied to an input skin is gone. Scrape or sell those first if they carry value — souvenir stickers cannot be scraped, which is one more reason souvenir items are poor trade-up fodder.
Pattern index does not carry through. A Case Hardened input with a desirable pattern contributes nothing but its float. The output gets a fresh, random pattern index, which is why pattern-hunting via trade-ups is a separate and much longer game than float-hunting.
Taken together these mean a trade-up is genuinely destructive: ten items with their own histories, stickers and patterns become one item with none of them. Price that in before you decide the arithmetic works.
Where trade-up float genuinely pays off
Two situations justify the effort. The first is a single-collection contract where every possible output has a wide float range starting at or near 0.00, and at least one of those outputs carries a meaningful low-float premium — our page on lowest float CS2 skins explains where those premiums exist and how large they get. The second is a contract where the output tier is simply worth more than the inputs regardless of float, in which case float optimisation is a bonus rather than the thesis.
Everywhere else, the honest arithmetic is that you are paying a spread to convert ten items into one, and float work is decoration on a trade you should not be making. That is not a fashionable thing to say about trade-ups, but it matches what the numbers do. If you want to check current input costs before committing, the live price checker carries lowest listings across major venues, and the homepage has the wider guide index.
A pre-contract checklist
- Decide the output you want and confirm it is actually reachable from the collection you are feeding in. The contract does not let you choose.
- List every possible output skin in that pool and write down each one's float minimum and maximum. If any floor sits above the wear tier you are aiming for, accept that as a real probability of failure.
- Compute the target average input float by rearranging the formula:
required_avg = (target_float − output_min) ÷ (output_max − output_min). That number tells you exactly how clean your inputs need to be, before you spend anything. - Price the inputs at that float level across at least two venues, because low-float copies carry a premium that varies by marketplace. Our marketplace comparison covers fees and float visibility.
- Compute expected value across the whole output pool, weighted by how many inputs came from each collection — not just the outcome you are hoping for.
- Compare that against simply buying the target skin. Nine times out of ten, buying it outright is cheaper and certain. The tenth case is the only one worth running.
One honest caveat about the formula: it is community-derived from observed contract outputs, not officially published by Valve. Changes to the contract system would appear on the official Counter-Strike news feed before anywhere else, so that is the page to check if outputs ever stop matching the arithmetic. It has held for every contract I have run.
Step six is the one people skip, and it is the only step that reliably saves money. A trade-up is a purchase with extra steps and a probability distribution attached; if the direct purchase is cheaper than the expected cost of the contract, there is nothing to think about.
If all of this reads as discouraging, that is roughly the correct impression. Trade-up float mechanics are elegant and genuinely satisfying to optimise, and the optimisation is usually worth less than it feels like it should be. Understand the formula so the game stops surprising you — then use it mostly to explain why you are not running the contract. For the wider picture on how wear drives every price in Counter-Strike, start at the float and wear hub.